Welcome to the walkthrough for Bloons Tower Defense 5 Tutorial for the map "Park Path" on the Hard difficulty setting on Reverse mode with NAPSFRILLS (No Agents, Premiums, Specialties, Farming, Road Items, Lives Lost, Selling) The game can be played here (Alternate)
The way this walkthrough works is, I'll show a picture of the final setup right before the final round, and you place the towers where I placed them. (Click to expand image) Just follow the the steps, and upgrade as SOON as you have enough money, and you should be fine. This setup has been tested by me 3 times in a row without failure
Now let's get started!
First thing you'll want to do is:
* Build a Monkey Buccaneer
* Then upgrade it to 2/1
* Next build a Glue Monkey
* And upgrade him to 2/1 also
* Now build a Ninja Monkey (#1)
* Upgrade him to 2/2
* Followed by building Ninja Monkey (#2)
* Next upgrade Ninja Monkey (#2) to 3/2
* Make Monkey Apprentice (#1)
* Upgrade him to 2/2
* Now build Monkey Apprentice (#2)
* And upgrade him to 2/1
* Next upgrade your Glue Gunner to 2/2
* And your Monkey Buccaneer to 3/1
* Now upgrade both of your Monkey Apprentices once on the left path
* Upgrade Ninja Monkey (#2) to 4/2
* Build a Monkey Village
* And upgrade it to 2/2
* Now make Super Monkey (#1)
* And upgrade it to 0/2
* Next upgrade Ninja Monkey (#1) to 2/3
* Build a Bomb Tower beside Ninja Monkey (#1)
* Upgrade it to 3/2
* Now upgrade Super Monkey (#1) to 2/3
* And your Glue Gunner to 2/3
* ...And your Bomb Tower to 4/2
* Make 4 more Bomb Towers all on Target Priority: Strong
* Upgrade all 4 of them to 2/3
* And your Monkey Buccaneer to 4/1
* Make Super Monkey (#2)
* Upgrade it to 2/3
* Finally upgrade any 3 Bomb Towers to 2/4
* When the ZOMG comes, spam the ability button, and he should be gone in a matter of seconds ;)
And that's it!
Any feedback would be greatly appreciated, and it's never too late to comment! Thank you!
12 July 2015
11 July 2015
BTD5 Monkey Lane Hard Reverse NAPSFRILLS
Welcome to the walkthrough for Bloons Tower Defense 5 Tutorial for the map "Monkey Lane" on the Hard difficulty setting on Reverse mode with NAPSFRILLS (No Agents, Premiums, Specialties, Farming, Road Items, Lives Lost, Selling) The game can be played here (Alternate)
The way this walkthrough works is, I'll show a picture of the final setup right before the final round, and you place the towers where I placed them. (Click to expand image) Just follow the the steps, and upgrade as SOON as you have enough money, and you should be fine. This setup has been tested by me 3 times in a row without failure
Now let's get started!

* Upgrade your Ninja Monkey to 3/0
* ...And again to 3/1
* .....And again to 4/1
* Build a Monkey Apprentice
* Upgrade your Monkey Apprentice to 3/1
* Build Monkey Apprentice #2
* Upgrade Monkey Apprentice #2 to 2/1
* Now build a Super Monkey
* Build a Monkey Village
* Upgrade your Super Monkey to 0/2
* Build a Bomb Tower under the Super Monkey
* Upgrade your Bomb Tower to 3/2
* Now upgrade your Monkey Village to 2/2
* And your Super Monkey to 2/3
* And finally your Bomb Tower to 4/2
* Build a Glue Gunner
* Upgrade your Glue Gunner to 2/3
* Build a Monkey Ace, and set him on the circle path.
* Upgrade your Monkey Ace to 4/1
* Build 6 Bomb Towers, and set them all to target priority: Strong.
* Upgrade all 6 Bomb Towers to 0/3
* And again to 2/4
* Use your MOAB Assassin ability wherever you see fit, but make sure you have all 6 of them recharged for round 85.
* When the ZOMG comes, spam the ability button, and he should be gone in a matter of seconds ;)
And that's it!
Any feedback would be greatly appreciated, and it's never too late to comment! Thank you!
The way this walkthrough works is, I'll show a picture of the final setup right before the final round, and you place the towers where I placed them. (Click to expand image) Just follow the the steps, and upgrade as SOON as you have enough money, and you should be fine. This setup has been tested by me 3 times in a row without failure
Now let's get started!

The first thing you'll want to do is
* Build a Ninja Monkey* Upgrade your Ninja Monkey to 3/0
* ...And again to 3/1
* .....And again to 4/1
* Build a Monkey Apprentice
* Upgrade your Monkey Apprentice to 3/1
* Build Monkey Apprentice #2
* Upgrade Monkey Apprentice #2 to 2/1
* Now build a Super Monkey
* Build a Monkey Village
* Upgrade your Super Monkey to 0/2
* Build a Bomb Tower under the Super Monkey
* Upgrade your Bomb Tower to 3/2
* Now upgrade your Monkey Village to 2/2
* And your Super Monkey to 2/3
* And finally your Bomb Tower to 4/2
* Build a Glue Gunner
* Upgrade your Glue Gunner to 2/3
* Build a Monkey Ace, and set him on the circle path.
* Upgrade your Monkey Ace to 4/1
* Build 6 Bomb Towers, and set them all to target priority: Strong.
* Upgrade all 6 Bomb Towers to 0/3
* And again to 2/4
* Use your MOAB Assassin ability wherever you see fit, but make sure you have all 6 of them recharged for round 85.
* When the ZOMG comes, spam the ability button, and he should be gone in a matter of seconds ;)
And that's it!
Any feedback would be greatly appreciated, and it's never too late to comment! Thank you!
9 July 2015
Submachine 0
Welcome to the walkthrough on the 3rd Submachine game: Submachine 0. This is a stand-alone game. It's not part of the main Submachine series. But it still plays just like the other ones. This game was made my Mateusz Skutnik in 2006 and is a simple click-escape adventure game. You can play it here: Submachine 0: Ancient Adventure (Alternate Link If you notice some graphical glitches in the first link, use this one.) Now let's get started!

As soon as you click play, you will see a door guarded by two stone dragons. Go left, and you will see a stone tongue in the bottom left corner. Click it to add it to your inventory.
 Then go right twice, and pick up the tongue on the stand. And look at the wall, and you'll see a gold rectangle in one of the bricks. Pick it up to see that it is actually a lighter. Now go back to the door and insert Tongue 2 in the first dragon, and Tongue 1 in the second dragon. Click the circle on the middle of the door, and it will slide open. Go inside, then head down the steps.
 Depending on your screen brightness, you may not be able to see this very well. On the left is a candle, and you need to light it with your lighter. If you can't see it, just click the lighter everywhere you can. From now on I'm going to assume your going to light the rooms as soon as you enter them. Go down, then left, then down, and flip the switch on the left wall. Great! That turned off the spikes above us. Go up, then into the newly accessible room. Click the stone, and go back to the place with the switch. Go right, and down. The door that matches the symbol on the cube just opened. Go inside and collect a red thing called "Jewel 1" Then go back to the stone, and click it again. Then go back to the door that it just opened, and collect the second jewel. Do the process one more time, after you get the 3rd jewel, look in the bottom right corner and pick up the plate.
 Go back to the room with the stone, and head right 3 times. Use the stone plate on the bottom part of the spikes on the right. Go on through and you'll see a statue with three slots. Hmm...3 slots...3 jewels...I'll let you figure that part out ;) Jump down, and find a floating diamond called a "Wisdom Gem" We got one of these in the first game, remember?
Congratulations! You have completed Submachine 0: Ancient Adventure!

As soon as you click play, you will see a door guarded by two stone dragons. Go left, and you will see a stone tongue in the bottom left corner. Click it to add it to your inventory.

 Depending on your screen brightness, you may not be able to see this very well. On the left is a candle, and you need to light it with your lighter. If you can't see it, just click the lighter everywhere you can. From now on I'm going to assume your going to light the rooms as soon as you enter them. Go down, then left, then down, and flip the switch on the left wall. Great! That turned off the spikes above us. Go up, then into the newly accessible room. Click the stone, and go back to the place with the switch. Go right, and down. The door that matches the symbol on the cube just opened. Go inside and collect a red thing called "Jewel 1" Then go back to the stone, and click it again. Then go back to the door that it just opened, and collect the second jewel. Do the process one more time, after you get the 3rd jewel, look in the bottom right corner and pick up the plate.
 Go back to the room with the stone, and head right 3 times. Use the stone plate on the bottom part of the spikes on the right. Go on through and you'll see a statue with three slots. Hmm...3 slots...3 jewels...I'll let you figure that part out ;) Jump down, and find a floating diamond called a "Wisdom Gem" We got one of these in the first game, remember?
Congratulations! You have completed Submachine 0: Ancient Adventure!
8 July 2015
Submachine 2
Welcome to the walkthrough on my personal favorite game in an ever-so-wonderful series: Submachine. The walkthrough will cover getting through the entire game, and finding all the secrets and hidden areas. This game is pretty simple. It's your average click-and-escape flash game created by Mateusz Skutnik in 2006. You can play it here: Submachine 2: The Lighthouse (Alternate Link If you notice some graphical glitches in the first link, use this one.) Keep in mind there are 2 versions of this game. The original V1 (2006) and the updated V4.1 (2013) I will be walkthroughing the new V4.1 It should say on the main menu which version you are playing. Now let's get started! When you click play a short intro will play. You can skip it if you want.

When it's over it will pop you in a red room with an arcade machine called "Submachine" in the center of the room. And on the screen is a picture of the ending scene from the first game. You can click on the machine to zoom in. When zoomed in on the machine, look to the right in between the two rocks, and you'll see a very small red ball. This is called a secret, and there are 20 of them in the game. Click it, and it will add it to your inventory.
If you look, there is also the first diary page from the first game, as well as the wisdom gem added to your inventory. Go left all the way until you reach a flight of stairs, and go up it. Pick up the cog wheel on the ground, and if you look closely, on top of the chair cushion there will be another secret. Go back down, then go right once, and you'll see a strange contraption. Put the wisdom gem in the stand on the left, and now click the white ball that just appeared on the thing on the right. A sound will play, and if you go right, you'll see that a ladder has appeared. Go right again, and examine the phonograph on the floor. Insert the cog wheel into the slot, (You'll find it) and press the green button. Whoops. Now some eerie music is playing. Go up the ladder and go right. click on the bottom left corner of the strange box, and you should see an etching that reads C=? The number is different for everyone, so right down what it is. You'll need it for later. Go left, then go up the ladder again, and enter the sewers to the left. Keep going left in the sewers until you find the room key on the floor. Pick it up, then exit again. Go up the ladder until you reach a blue room.

Go left, and if you look on the wall in between the two doors, you'll see a cracked tile. Click it to reveal a third secret. (Look at the picture for help.)
Go left again, and look at the knobs of the camera stand to find another secret. Now go right, then head up the stairs twice, and you'll see a secret in the rubble of the broken wall.
Go up one more time, and you'll reach the hallway. Go left and you'll see two doors. Go in the one on the left to find a reading room. There's a piece of paper sticking out of some books on the shelf. Click it, and read it if you wish. Then use the room key we got from the sewers on the door on the right, to find a bathroom. Nothing to do here except to pick up the key.
 Leave, and go right three times, and look above at the light fixture on the ceiling to find a secret.
Go right, and... hey wait a sec, isn't that the same picture of a lighthouse from the first game? This time it actually serves a purpose. Examine it, then click on the arrow pointing to a window, and it'll show a combination of symbols. Write this down too. Then pick up one of the pamphlets on the right of the painting, and read it if you wish. Seems like we're in a place called the "Kent Lighthouse". Go right and pick up the secret in the pile of dirt. Head back down the stairs, and go all the way back to the sewers. Now it's time to use your sewer key.
Now this is a really big place, and it's very easy to get lost, so I have provided a picture of a map of the entire area. Click on it to expand it. But here is what You need to do. I'm going to abbreviate the directions now. (Right is R, Left is L, Up is U, Down is D) So follow along.

From the very start go L, D, R, and pick up the key. Go L, U, L, L, D, Pick up the secret. Go D, D, R, U, then you'll find a red room. Pick up the Letter to Liz and the secret in the alcove, on the right wall. Then go D, L, D, L, L, L, U, R Now you have to solve this puzzle. The goal is to turn all of the dots blue, and to be honest, there really isn't a good strategy, Just use those big brains of yours and you'll eventually get it. When all the dots are green. Go L, D, R, R, U, and pick up the handle. Go D, R, U, U, U, U, L, L, L, L, D, R, Pick up the positive coil. Go L, U, L, L , Click the secret. Now you can go right all the way until you exit.

As soon as you exit, go right, and click in the alcove on the wall, and pick up the fork. Look very closely in the top right corner, and in between some bricks you'll find another secret.
Go left and climb the ladder to the blue room, and go up the ladder again, and go into the alcove in the right wall, and put the newly acquired lever in the slot on the wall, pull it, and a sound like something falling, will play. Go back to the room with the camera, and go all the way up the stairs. Go right and go into the the metal room. Pick up the negative coil on the ground, and climb the ladder twice, and use your 2nd floor key on the door. Go into the left door, and click on the typewriter, and collect Diary 2. Now you have the whole thing. It appears that they wanted to bury the lighthouse with "mur" inside of it. But wait, whats that on the bottom of the page? M=??? this number is important later on, Keep it in mind. Go left, and pick up the movie memory on the dresser, then leave, and head into the door on the right. Click on the glowing green thing. Remember those symbols from the picture of the lighthouse? Punch them in, and press the button on top, and the hatch at the bottom of the pedestal will open, giving you a light bulb. Go right and amongst the folded sheets on the end of the bed is another paper. I'm sure you've been wondering what the moving black contraption is on the table. Well click it to reveal 4 whole secrets! There is no strategy to this. At all. Just keep moving your cursor to those little buggers, and eventually, you'll collect them all. Now leave the room, and go out the door, and head up the ladder, to find a lever, with a broken circuit. Let's try using the fork we got to complete the circuit. Pull the lever, and ladder will down from above.
 But first let's head right. Go up the ladder, and see a secret resting on the cord for the light on the wall. Click the contraption, and be presented with yet another puzzle. The goal is to connect all of the rods with the square in the middle, by pressing buttons. You only need to press the 2 buttons on the top left. (Look at the picture.) Just keep holding them down until the 2 rods eventually meet in the center.
With that completed, lets head over to the area to the left of the ladder. Now you need to enter a 4 digit combo for this. Remember the cat that was mentioned in the diaries? Einstein? What was Albert Einstein famous for? Well figuring out the formula to find energy. E=MC2. Remember the numbers from earlier? We need to plug those into the equation. So whatever number C was on the box at the beginning. you need to times that number by itself. So for example if the box said C=2, you need to multiply 2x2. which is 4. Now you need to multiply THAT number (4) by whatever the number was on the Diary 2 page. For example mine said M=552 So then the 4-digit combo would be 4x552 Which = 2208 Now of course you have to use whatever numbers the game gave YOU not me. When the number is entered correctly, the light above will turn green.
 Now go the area where you placed the fork, and go up twice. If you look closely on each side of the wall, you'll see two openings. Go in the left one to get a secret, and go in the right one to enter a new room. This is where you need to put in your coils. Red goes in the + socket. And blue goes in the - socket. Both the lights should turn green.
Leave, and go up the very top of the Kent Lighthouse Where you will see a giant bulb, as well as a note on the wall. It's mur, saying that this is actually a portal, and that it's very unstable. Look in the bottom left corner of the room, and find a secret in the bundle of wires on the floor. Go to the right, and see a dig out key in the dirt. Now go aaaaaaaaaaall the way back down to the yellow hallway, and go all the way to the left. There's a secret on the window sill. Now use your key, and crawl through the tunnel. Go left a few times and pick up the 20th and final secret. Unfortunately you don't get any sort of reward or recognition for finding all the secrets, besides a little message on the menu when you beat the game, but it was still fun! You will find yourself in a little cavern dugout by (probably) mur. Pick up the fuse on the ground, and head back to the camera room. Insert the light bulb and the movie memory into the slots on the camera, and flip the switch. Click at the lens, and you're shown a still picture of a quite cluttered table. Click the ID card on the table, and a hand will pick it up, and shove it through the lens. (What?) Pick it up, and head back to the top of the lighthouse. Go to the left and insert the ID card. Go to the right, and insert the fuse. Then finally pull the lever, and Congratulations! you have completed the second game in the submachine series!

When it's over it will pop you in a red room with an arcade machine called "Submachine" in the center of the room. And on the screen is a picture of the ending scene from the first game. You can click on the machine to zoom in. When zoomed in on the machine, look to the right in between the two rocks, and you'll see a very small red ball. This is called a secret, and there are 20 of them in the game. Click it, and it will add it to your inventory.
If you look, there is also the first diary page from the first game, as well as the wisdom gem added to your inventory. Go left all the way until you reach a flight of stairs, and go up it. Pick up the cog wheel on the ground, and if you look closely, on top of the chair cushion there will be another secret. Go back down, then go right once, and you'll see a strange contraption. Put the wisdom gem in the stand on the left, and now click the white ball that just appeared on the thing on the right. A sound will play, and if you go right, you'll see that a ladder has appeared. Go right again, and examine the phonograph on the floor. Insert the cog wheel into the slot, (You'll find it) and press the green button. Whoops. Now some eerie music is playing. Go up the ladder and go right. click on the bottom left corner of the strange box, and you should see an etching that reads C=? The number is different for everyone, so right down what it is. You'll need it for later. Go left, then go up the ladder again, and enter the sewers to the left. Keep going left in the sewers until you find the room key on the floor. Pick it up, then exit again. Go up the ladder until you reach a blue room.

Go left, and if you look on the wall in between the two doors, you'll see a cracked tile. Click it to reveal a third secret. (Look at the picture for help.)
Go left again, and look at the knobs of the camera stand to find another secret. Now go right, then head up the stairs twice, and you'll see a secret in the rubble of the broken wall.
Go up one more time, and you'll reach the hallway. Go left and you'll see two doors. Go in the one on the left to find a reading room. There's a piece of paper sticking out of some books on the shelf. Click it, and read it if you wish. Then use the room key we got from the sewers on the door on the right, to find a bathroom. Nothing to do here except to pick up the key.
 Leave, and go right three times, and look above at the light fixture on the ceiling to find a secret.
 Go right, and... hey wait a sec, isn't that the same picture of a lighthouse from the first game? This time it actually serves a purpose. Examine it, then click on the arrow pointing to a window, and it'll show a combination of symbols. Write this down too. Then pick up one of the pamphlets on the right of the painting, and read it if you wish. Seems like we're in a place called the "Kent Lighthouse". Go right and pick up the secret in the pile of dirt. Head back down the stairs, and go all the way back to the sewers. Now it's time to use your sewer key.
Now this is a really big place, and it's very easy to get lost, so I have provided a picture of a map of the entire area. Click on it to expand it. But here is what You need to do. I'm going to abbreviate the directions now. (Right is R, Left is L, Up is U, Down is D) So follow along.
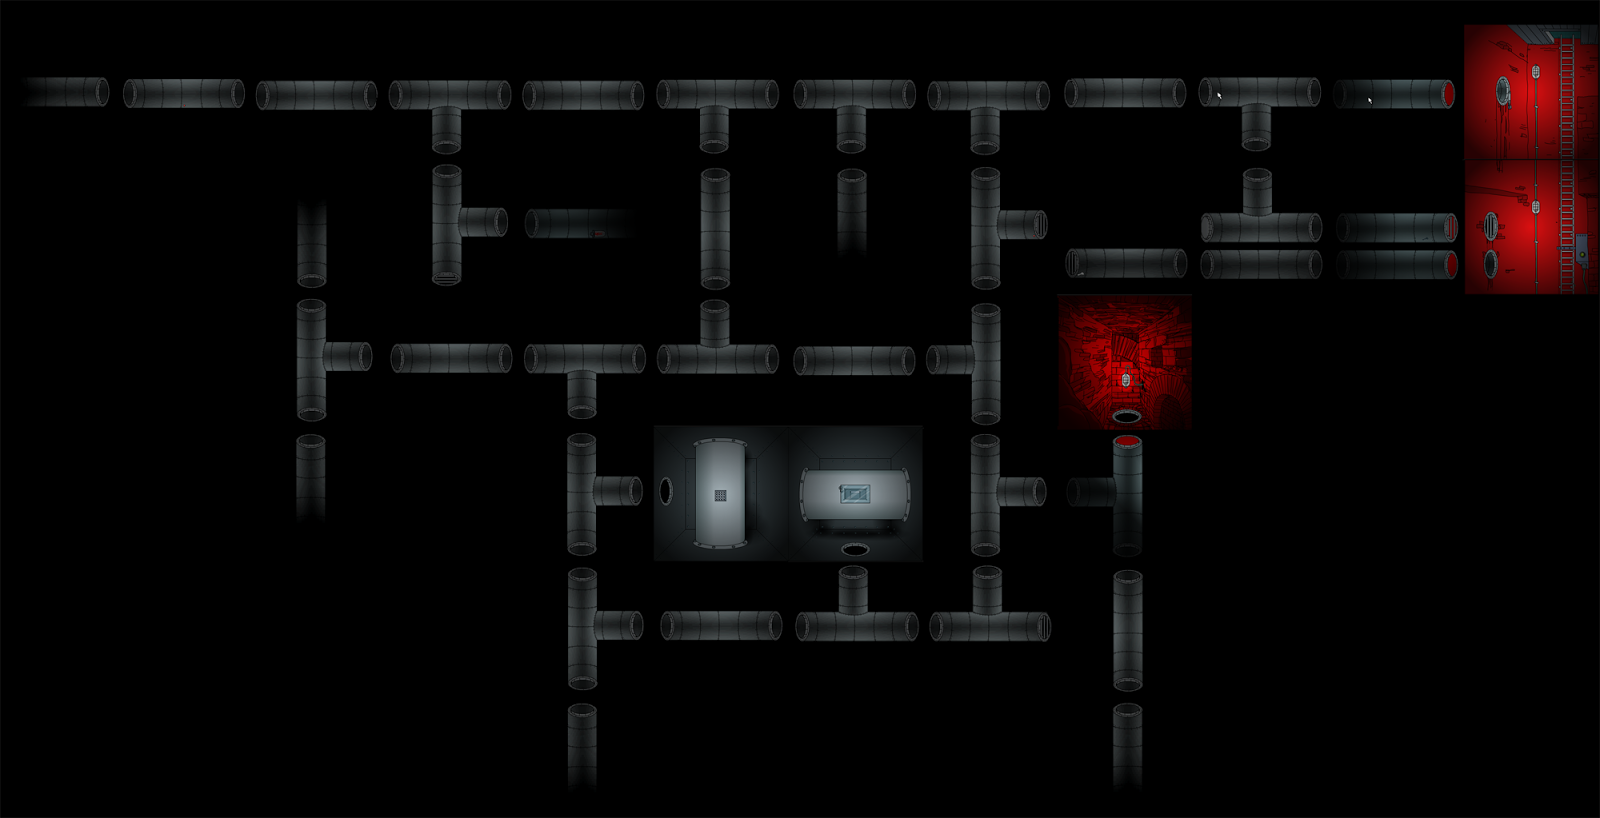
From the very start go L, D, R, and pick up the key. Go L, U, L, L, D, Pick up the secret. Go D, D, R, U, then you'll find a red room. Pick up the Letter to Liz and the secret in the alcove, on the right wall. Then go D, L, D, L, L, L, U, R Now you have to solve this puzzle. The goal is to turn all of the dots blue, and to be honest, there really isn't a good strategy, Just use those big brains of yours and you'll eventually get it. When all the dots are green. Go L, D, R, R, U, and pick up the handle. Go D, R, U, U, U, U, L, L, L, L, D, R, Pick up the positive coil. Go L, U, L, L , Click the secret. Now you can go right all the way until you exit.

As soon as you exit, go right, and click in the alcove on the wall, and pick up the fork. Look very closely in the top right corner, and in between some bricks you'll find another secret.
Go left and climb the ladder to the blue room, and go up the ladder again, and go into the alcove in the right wall, and put the newly acquired lever in the slot on the wall, pull it, and a sound like something falling, will play. Go back to the room with the camera, and go all the way up the stairs. Go right and go into the the metal room. Pick up the negative coil on the ground, and climb the ladder twice, and use your 2nd floor key on the door. Go into the left door, and click on the typewriter, and collect Diary 2. Now you have the whole thing. It appears that they wanted to bury the lighthouse with "mur" inside of it. But wait, whats that on the bottom of the page? M=??? this number is important later on, Keep it in mind. Go left, and pick up the movie memory on the dresser, then leave, and head into the door on the right. Click on the glowing green thing. Remember those symbols from the picture of the lighthouse? Punch them in, and press the button on top, and the hatch at the bottom of the pedestal will open, giving you a light bulb. Go right and amongst the folded sheets on the end of the bed is another paper. I'm sure you've been wondering what the moving black contraption is on the table. Well click it to reveal 4 whole secrets! There is no strategy to this. At all. Just keep moving your cursor to those little buggers, and eventually, you'll collect them all. Now leave the room, and go out the door, and head up the ladder, to find a lever, with a broken circuit. Let's try using the fork we got to complete the circuit. Pull the lever, and ladder will down from above.
 But first let's head right. Go up the ladder, and see a secret resting on the cord for the light on the wall. Click the contraption, and be presented with yet another puzzle. The goal is to connect all of the rods with the square in the middle, by pressing buttons. You only need to press the 2 buttons on the top left. (Look at the picture.) Just keep holding them down until the 2 rods eventually meet in the center.
 With that completed, lets head over to the area to the left of the ladder. Now you need to enter a 4 digit combo for this. Remember the cat that was mentioned in the diaries? Einstein? What was Albert Einstein famous for? Well figuring out the formula to find energy. E=MC2. Remember the numbers from earlier? We need to plug those into the equation. So whatever number C was on the box at the beginning. you need to times that number by itself. So for example if the box said C=2, you need to multiply 2x2. which is 4. Now you need to multiply THAT number (4) by whatever the number was on the Diary 2 page. For example mine said M=552 So then the 4-digit combo would be 4x552 Which = 2208 Now of course you have to use whatever numbers the game gave YOU not me. When the number is entered correctly, the light above will turn green.
 Now go the area where you placed the fork, and go up twice. If you look closely on each side of the wall, you'll see two openings. Go in the left one to get a secret, and go in the right one to enter a new room. This is where you need to put in your coils. Red goes in the + socket. And blue goes in the - socket. Both the lights should turn green.
 Leave, and go up the very top of the Kent Lighthouse Where you will see a giant bulb, as well as a note on the wall. It's mur, saying that this is actually a portal, and that it's very unstable. Look in the bottom left corner of the room, and find a secret in the bundle of wires on the floor. Go to the right, and see a dig out key in the dirt. Now go aaaaaaaaaaall the way back down to the yellow hallway, and go all the way to the left. There's a secret on the window sill. Now use your key, and crawl through the tunnel. Go left a few times and pick up the 20th and final secret. Unfortunately you don't get any sort of reward or recognition for finding all the secrets, besides a little message on the menu when you beat the game, but it was still fun! You will find yourself in a little cavern dugout by (probably) mur. Pick up the fuse on the ground, and head back to the camera room. Insert the light bulb and the movie memory into the slots on the camera, and flip the switch. Click at the lens, and you're shown a still picture of a quite cluttered table. Click the ID card on the table, and a hand will pick it up, and shove it through the lens. (What?) Pick it up, and head back to the top of the lighthouse. Go to the left and insert the ID card. Go to the right, and insert the fuse. Then finally pull the lever, and Congratulations! you have completed the second game in the submachine series!
Submachine 1
Welcome to the walkthrough on the first game in an ever-so-wonderful series: Submachine. This game is pretty simple. It's your average click-and-escape flash game created by Mateusz Skutnik in 2005. You can play it here: Submachine 1: The Basement. (Alternate Link. If you notice some Graphical glitches in the first link, use this one.) Keep in mind there are a few versions of this game, and I will be walkthroughing the newest version V5 March 2014. It should say the version number on the menu. Now let's get started!
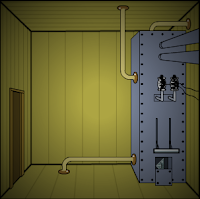
The first thing you'll see when you click play is a square yellowish room with 2 doors, a ladder, and some strange metal plate in the middle.


You can click on entrances to go in that direction and change rooms. Take your time to explore if you want, and when you're ready, the first thing you'll want to do is go down the ladder. You'll see a picture of a lighthouse on the wall, and you can click it if you want, but it serves no purpose. Go down again, and you'll see a lever, and a note on the floor. Click both of them. You can click objects in your inventory to examine them. Such as the note you just got. (It is recommended to read all the notes and letters you find in the series to get a feeling for the story-line and learn a bit about the game's lore.) The lever you pulled doesn't actually do anything quite yet. When you activate all 4 of them it will open a door later.
Go down yet another ladder to find a metal thing in the top left corner with a combination of symbols on it. Remember it, you'll need it for later. Each time you play the combination is different.
Go right, and you'll see some bells hanging from the ceiling. This is the order you need to click them in from left to right: 4 - 1 - 2. The cubes will rise, and a plate will appear on the stand. Click it and it will open, giving you a new object called "Tile D". Go back up to the room with the picture of a lighthouse, and go left. Remember that combination I told you to remember? Click on the circles below the pistons the match up with combo from earlier. Next go down the ladder, and you'll see an electrical box with a small coin under it, collect it, and click it when it's in your inventory to examine it. You'll see a bird, and 3 symbols to the right of it. Hover over them with your mouse, and a number will appear at the bottom of the screen. Write it down if you have to. Again the numbers are different each time you play. Go back up to the starting room and go left to see a pipe. Wait, that looks like it connects to the pistons we messed around with earlier. Interesting. Go left to see a grandfather clock with a missing pearl, then go up, and pick up the valve behind the pipe, and pull your second lever.

Go back two rooms, to reach the pipe again. Put the newly acquired valve in the opening, and click it to turn it. You'll hear a sound like something breaking, and a crash of water. Time to investigate! Go down to the lighthouse room, then go right, down, right, down to find the pipe that burst. Look in the rubble, and you'll find a small pearl.
Go up again to see the radio that we missed. Click the button on the right, and some music will play and the top drawer will slowly start to open. When it finally does, you'll find a shiny spoon to collect. Neat. Go back to the lighthouse room , then go down twice then left once. Examine the panel connected to the chest on the right through some wires. Now what could the combo be...Oh! How about the numbers we found on the coin? Enter those and you are presented with a click, and a fuse within the chest. Go back to the lighthouse room and then go right, and down. Insert the fuse in the box, and Viola! Powers on!
Go back to the first room, then right twice to see a lever attached to a large electrical device. Pull it, then electricity will spark between the two bulbs. Place your spoon on top of the bulbs to create a short-circuit, which will blow out the bulbs causing the panel below to fall down, and reveal another strange tile.
Go left all the way, until you reach that old grandfather clock. Insert the pearl you got onto the string, and they will move, and play a little jingle, and the hatch will slide open, giving you another tile. Go to the lighthouse room yet again, then go left, and down, and it appears that the electricity blew the panel off this box revealing our 3rd lever. Pull it down, and what was that? Did something open? Let's split up, and search for clues, gang!

Go back to the first room, and go right, and up, to see that yes, indeed a hatch has opened on the ceiling. Crawl inside, and you'll see a floating gem. Pretty ominous. Collect, and you'll see that it's called a "Wisdom Gem". These will become important later on in the series.
Go back down to the lighthouse room then go right, down, right, then up, to see a tile floating in some kind of orb. Collect it, and go back to the first room. I'm sure you've guessed, where the tiles go by now. Insert all of them into the metal panel in the center of the room, in any order, and then it will start spinning, and then a door will appear. Click it. Oh, it's an elevator. Go inside and press the top button, and the elevator will start to rise. When it stops, hit the bottom button ,and the door will open, leading you to your freedom! Congratulations, you have completed the first game in the Submachine series!
The first thing you'll see when you click play is a square yellowish room with 2 doors, a ladder, and some strange metal plate in the middle.


You can click on entrances to go in that direction and change rooms. Take your time to explore if you want, and when you're ready, the first thing you'll want to do is go down the ladder. You'll see a picture of a lighthouse on the wall, and you can click it if you want, but it serves no purpose. Go down again, and you'll see a lever, and a note on the floor. Click both of them. You can click objects in your inventory to examine them. Such as the note you just got. (It is recommended to read all the notes and letters you find in the series to get a feeling for the story-line and learn a bit about the game's lore.) The lever you pulled doesn't actually do anything quite yet. When you activate all 4 of them it will open a door later.
Go down yet another ladder to find a metal thing in the top left corner with a combination of symbols on it. Remember it, you'll need it for later. Each time you play the combination is different.
Go right, and you'll see some bells hanging from the ceiling. This is the order you need to click them in from left to right: 4 - 1 - 2. The cubes will rise, and a plate will appear on the stand. Click it and it will open, giving you a new object called "Tile D". Go back up to the room with the picture of a lighthouse, and go left. Remember that combination I told you to remember? Click on the circles below the pistons the match up with combo from earlier. Next go down the ladder, and you'll see an electrical box with a small coin under it, collect it, and click it when it's in your inventory to examine it. You'll see a bird, and 3 symbols to the right of it. Hover over them with your mouse, and a number will appear at the bottom of the screen. Write it down if you have to. Again the numbers are different each time you play. Go back up to the starting room and go left to see a pipe. Wait, that looks like it connects to the pistons we messed around with earlier. Interesting. Go left to see a grandfather clock with a missing pearl, then go up, and pick up the valve behind the pipe, and pull your second lever.

Go back two rooms, to reach the pipe again. Put the newly acquired valve in the opening, and click it to turn it. You'll hear a sound like something breaking, and a crash of water. Time to investigate! Go down to the lighthouse room, then go right, down, right, down to find the pipe that burst. Look in the rubble, and you'll find a small pearl.
Go up again to see the radio that we missed. Click the button on the right, and some music will play and the top drawer will slowly start to open. When it finally does, you'll find a shiny spoon to collect. Neat. Go back to the lighthouse room , then go down twice then left once. Examine the panel connected to the chest on the right through some wires. Now what could the combo be...Oh! How about the numbers we found on the coin? Enter those and you are presented with a click, and a fuse within the chest. Go back to the lighthouse room and then go right, and down. Insert the fuse in the box, and Viola! Powers on!

Go back to the first room, then right twice to see a lever attached to a large electrical device. Pull it, then electricity will spark between the two bulbs. Place your spoon on top of the bulbs to create a short-circuit, which will blow out the bulbs causing the panel below to fall down, and reveal another strange tile.
Go left all the way, until you reach that old grandfather clock. Insert the pearl you got onto the string, and they will move, and play a little jingle, and the hatch will slide open, giving you another tile. Go to the lighthouse room yet again, then go left, and down, and it appears that the electricity blew the panel off this box revealing our 3rd lever. Pull it down, and what was that? Did something open? Let's split up, and search for clues, gang!

Go back to the first room, and go right, and up, to see that yes, indeed a hatch has opened on the ceiling. Crawl inside, and you'll see a floating gem. Pretty ominous. Collect, and you'll see that it's called a "Wisdom Gem". These will become important later on in the series.
Go back down to the lighthouse room then go right, down, right, then up, to see a tile floating in some kind of orb. Collect it, and go back to the first room. I'm sure you've guessed, where the tiles go by now. Insert all of them into the metal panel in the center of the room, in any order, and then it will start spinning, and then a door will appear. Click it. Oh, it's an elevator. Go inside and press the top button, and the elevator will start to rise. When it stops, hit the bottom button ,and the door will open, leading you to your freedom! Congratulations, you have completed the first game in the Submachine series!
Subscribe to:
Comments (Atom)